


The Drum Pattern Generator uses Polyrhythmic Geometry to help you discover new syncopations and generate complex drum grooves instantly.
Drum Pattern Generator menggunakan Polyrhythmic Geometry untuk membantu Anda menemukan sinkopasi baru dan membuat groove drum kompleks secara instan.
Mathematical PolyrhythmsPolyrhythm Matematis
Visualize complex beats through geometric shapes. Experiment with different Euclidean rhythms to break free from the standard grid.
Visualisasikan beat kompleks melalui bentuk geometris. Bereksperimenlah dengan ritme Euclidean untuk keluar dari batasan grid standar.
Quick Edit BarQuick Edit Bar
Assign the generated rhythms to specific outputs like Kick, Snare, or Hi-Hat instantly using the Quick Edit tools.
Tugaskan ritme yang dihasilkan ke output tertentu seperti Kick, Snare, atau Hi-Hat secara instan menggunakan fitur Quick Edit.
Geometric VisualizerVisualizer Geometris
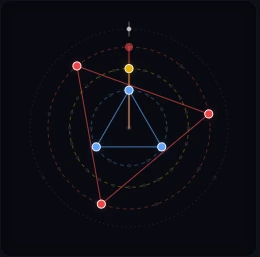
The core of the generator is the Geometric Visualizer. Instead of placing MIDI notes on a grid, you manipulate shapes (polygons). Each point on the shape represents a drum hit (pulse). By adjusting the number of steps and pulses, you create Euclidean rhythms.
Rotate the shapes to create syncopation and offset rhythms against each other, instantly generating complex polyrhythms.
Inti dari generator ini adalah Visualizer Geometris. Alih-alih menaruh not MIDI di grid, kamu memanipulasi bentuk (poligon). Setiap titik pada bentuk mewakili pukulan drum (pulse). Dengan mengatur jumlah step dan pulse, kamu dapat membuat ritme Euclidean.
Putar bentuk tersebut untuk menciptakan sinkopasi dan offset ritme satu sama lain, menghasilkan polyrhythm kompleks secara instan.
Rhythm PresetsPreset Ritme
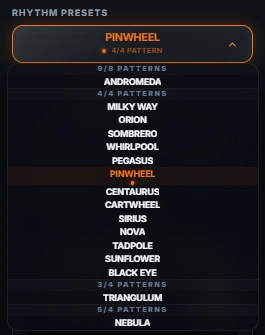
Don't want to start from scratch? Use the Rhythm Presets dropdown. We have carefully crafted dozens of generative presets categorised by time signatures (e.g., 4/4, 9/8, 7/4).
Load presets like Andromeda, Pinwheel, or Sombrero to instantly kickstart your groove or drum fill ideas.
Tidak ingin memulai dari awal? Gunakan dropdown Preset Ritme. Kami telah meracik puluhan preset generatif yang dikategorikan berdasarkan birama (misalnya 4/4, 9/8, 7/4).
Pilih preset seperti Andromeda, Pinwheel, atau Sombrero untuk langsung mendapatkan ide groove atau drum fill dengan cepat.
Quick Edit RoutingRouting Quick Edit
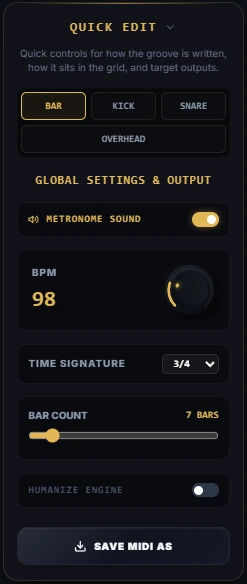
Generating the pattern is only half the process. The Quick Edit Bar lets you assign each geometric layer to a specific drum instrument.
You can easily map the inner ring to the Kick, the middle ring to the Snare, and the outer ring to the Overhead (Hi-Hats/Cymbals). This transforms abstract math into a playable, realistic drum kit arrangement instantly.
Membuat pola hanyalah setengah dari proses. Quick Edit Bar memungkinkan kamu menetapkan setiap lapisan geometris ke instrumen drum tertentu.
Kamu bisa memetakan lingkaran dalam ke Kick, lingkaran tengah ke Snare, dan lingkaran luar ke Overhead (Hi-Hats/Cymbals). Fitur ini menyulap hitungan matematis abstrak menjadi aransemen drum kit yang realistis secara instan.
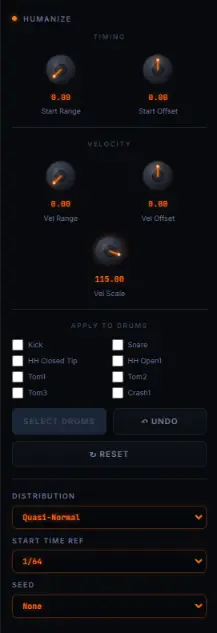
Combine the mathematical patterns with our Humanize Engine (Timing & Velocity) to make these generative grooves sound like they were played by a real drummer.
Kombinasikan pola matematis ini dengan Humanize Engine (Timing & Velocity) untuk membuat groove generatif ini terdengar seperti dimainkan oleh drummer sungguhan.